Wednesday, September 16, 2015

Burda Style Wrap Band Trouser Pattern Review

Its been a long while since the last post.
Time to back track a little now as the holiday has come and gone.

There are a lot of stories about western Europe (its meant to be the better/developed side of Europe right??) and petty crime, and the worst part of a holiday is when you have just arrived in a new place, with your luggage, and trying to find your way to the hotel. Unless you have been to the destination before, you will inevitably look a bit lost sometimes. That's bad for you but great for the opportunists.

So at the last minute i decide i need to find a pair of pants that won't be so easy for pickpockets and i wouldn't have to worry so much about my pockets when i'm lugging luggage around in a foreign place (you will never regret travelling light =) ).
The shopping selection is pretty dismal in Sydney anyway so it would be impossible in the short amount of time so it was time to pull out the good ol' Burdas.

Thank goodness for Burda Style 10/2014 #119 'Trousers with Wrap Band'.
The pants are a loose style made in a lightweight fluid fabric and it has pockets and the wrap around tie covers the opening of the pockets. Perfect for the summer and paranoia.


Being a a craftster that sews (what would you want to call this... a sewer? a 'sew-er' but it readers like 'sue-er'... like the pipes that take waste water =P ), i hoard fabric so i just had to shop from my hoard. I picked out a lightweight cotton/silk blend with stars and spots woven into it.


This pattern was simple and fairly quick - i think i made these in a week <-- this is actually fast for me =P
The sizing was true to size and the pattern pieces matched up correctly.
But Burda is Burda and the only problem with the huge jumble of almost indistinguishable patterns printed on top of patterns on top of patterns on the pattern sheets. I was in such a hurry to trace out the right pattern, i accidently left out the front fly flap... and i didnt notice until i got up to the part of putting in the front zip. Quelle Horreur!!!
Yep.. that means i had already cut out the fabric pieces (and i had already bought the matching blue zip in the right length *sigh*).

Part of being crafty is to be crafty as well, right?

Here is the finished trousers...


Front - tied up as they did in Burda images

Front of pants without the bands tied - you can see the pleating and pockets that sit underneath

The band is quite long so you can tie it up into a bow

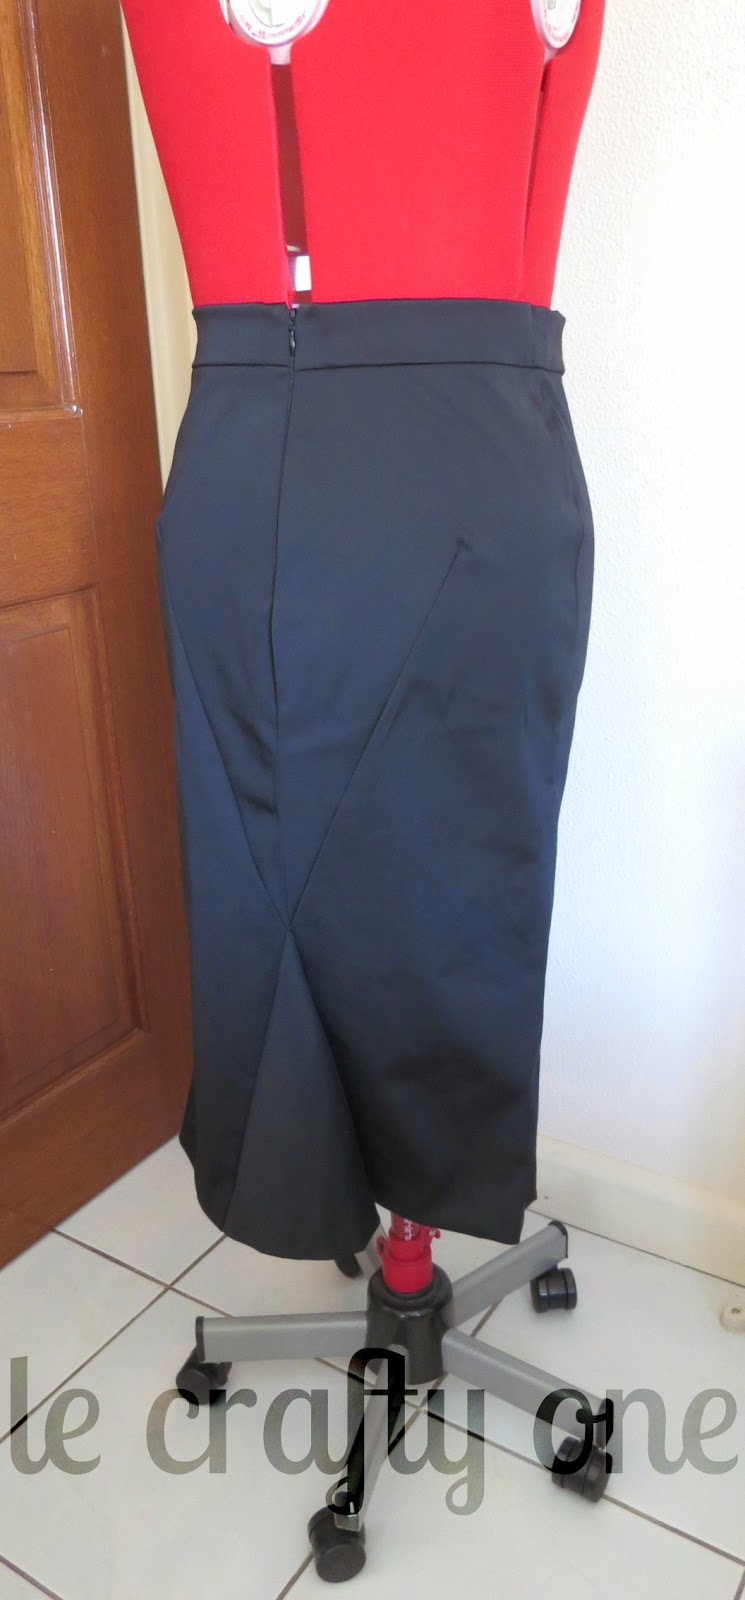
And the back... revealing my hack...
The loose silhouette makes the pants look stumpy on the hanger... =P

My quick fix solution was to just stitch up the front and install an invisible zip in the back due to lack from front fly flaps. Benefit i found with this is that i dont have to until the front every time i needed to go to the toilet. Bonus!
And yep, the zip is black... i had a stash of black invisible zips and had no time at all to go out and buy a matching blue one.

This is a great pattern. I had no issues with it, other than my eyes going crossed from tracing out the pattern.
I would definitely recommend and re-make (if i was ever inclined to).

Friday, July 3, 2015

A quickie with Madame Nightshade (review)

Not much time lately to make new things... although i did find this totally awesome embroidery design. So here is a quickie.

Paris
Madame Nightshade's Beauty Emporium
Purveyor of extra fine beauty tonics & lotions
Est. 1889

This design can probably be considered the advertising shopping bag in the style of of late 19th century apothecaries - quite gothic.

This is an 'in-the-hoop' design which seems to mean that the embroidery design incorporates the 'sewing' together part of the item, and in this case, this becomes a drawstring pouch.
It absolutely made no sense to me at all o_O?
i even read the tutorial related to this particular design something like 10 times... and it still made no sense.

i resigned myself to just using the design without the 'in-the-hoop' part.
i stitched out the design and manually put the bag together... oh my, what a rebel =P

Voila!


Re-using ribbon taken off packaging (too much online shopping... and would be such a waste to just throw out)

Back - not much of a view here...


After putting this together manually, i re-visited the tutorial.
Now it makes total sense!
The method taught in putting the bag together was unusual. The way the drawstring is threaded in and tied was, in my opinion, completely unco!
It wasn't a 'real' drawstring pouch. Their ribbon effectively only drew together the front of the pouch (the back is still open) and would not stay cinched unless you tied the ends.
That is a terrible closure.
 Proper drawstring pouches allow you to pull two string outwards and cinches both the front and back of the pouch and will stay securely cinched.

I guess the manual sewing was required after all.


Monday, May 11, 2015

Average 45 Matches - Rebooted

Where there is a will, there is a way!

Previously i was not pleased with how the Sharpie Stained markers bled as it touched the fabric which kinda spoiled the look of the detailed image of my vintage match box design.

Well what the heck, might as well make use of my expensive toy - the embroidery machine.
After much time in front of the screen re-producing my design in photoshop and getting it digitized, im much more pleased with the (now costly) design on fabric =D

This time around, silver hardware with removable chain handle - so it can be used as a clutch without any strap, a hand held with a short chain strap, a shoulder bag or cross body with a longer strap.

Squeeeee!


Slidey, slidey, like a proper match

Push, don't pull...


Available at my etsy shop.
Since i'm still new to this, i'm open to feedback on my listings. Anything, let me know!


Wednesday, April 1, 2015

Burda Style Godet Skirt Pattern Review

What happens when you cant find the right bottom to match an existing top your mother has and time is running out for an upcoming wedding?
(Yep, i had to play stylist and find dressy bottom that works with her top)
You whip out the good old Burda Styles and find a quick and easy skirt to make!

I sifted through all the Burdas in my ever growing "collection" (i hesitate to use the word collection as it implies there is an emotional connection or attachment to these items) over and over and finally decided on a #103 godet pencil skirt from Burda issue 02/2011.

The skirt isn't very clear in the magazine since the skirt is black and the setting is quite dark!


Good thing about this skirt is that its 'minimalist' (code for quick and simple) and has an understated detail of interest in the back that makes it slightly different. Loving the big diagonal darts in the center back.


I made this skirt up in a black medium weight de-lustered stretch satin (yep, didn't need to use the reverse side of shiny shiny satin, both sides of this fabric is reverse side). Unlined.
I found the pattern to be quick and easy and very close to the line drawing. Thumbs up!
The pattern pieces lined up quite well. I've ran into commercial patterns in the past where the pieces didn't really fit together! So another thumbs up for this pattern.


My only complaint is that the pattern runs large. Based on the body measurements, i had made this up in the size 38 - already a slightly smaller than the measurements i had taken.
The right size should have been one size smaller - the 36. I had to do some quick and dirty downsizing. Not too noticeable in the end but the shape of the skirt would be changed for all eternity =P


Oops! i lost the photo of the front =P not much to look at though, its just plain.
Outfit to come.. that will show the front.

--------------------------------------------------------------------------------------------
ETA:
Adding my hopeless outfit pics :)


Escada silk & lace bustier

Guiseppe Zanotti fish bone heels

-------------------------------------------------------------------------------------------------

Monday, March 9, 2015

Kids, get your Craft on!

So... March is the US national month of Craft!
Who woulddathunk it?
And Australia being Australia, are adopting March as its own national craft month also.
One month for crafting? there aren't enough months in the year as is :P or days in a week or hours in a day.

i dont usually do home furnishings and appliques but heck, there is always a first for everything.

So months ago, i bought two cushions.. the ones that have nothing on them and are just a plain, thin cushion filler that go inside a fancy cushion cover.
The belief was that the cushion fillers would be destroyed before i ever got around to making covers for them. Ha!

The plan was to make some plain faux furry cushion covers (so its like a furry dog :D ), but i ran into some 'performance velvet' fabric in Stone at the local Spotlight in the furnishing department that was on sale and begs to be felt up.
Its not like dress velvet fabric, its cos a longer nap that goes in one direction rather than stand on end like regular velvet. Its more of a velour feel.

Plain stone covers would be boring :)
So it was time to come up with an idea for the fabric. Yep, typical. Hoard the fabric first then decide how to use it :P
And what the hey, while we're at it, who needs a pattern, just wing it.

Presenting the bunny and the mousey.


Dont sit on me

Surprise!

zig zag, zig zag

about face!
 This was the first time machine appliqueing and its great! Beats hand whip stitching hands down without a doubt. Much quicker :P

This is a great weekender project.
I would rate this project as "great to do again!" but there are only so many cushions one would need :D


Wednesday, February 18, 2015

Happy Lunar New Year


Here is a red packet for your viewing pleasure with maneki neko for good blessings for the year of the sheep.

Gong hei fatt choy!


Wednesday, February 11, 2015

Average 45 Matches

Finally got some slightly larger but still thinnish magnets in the mail and what better way to try them out than to use them in a slightly unusual box.

Modelling it off the humble matchbox comes the next design.
Vintage safety match boxes always feature interesting artwork and have usually have absolutely nothing to do with matches.

Since the designs are fairly intricate for only 2-3 colour designs, painting it onto fabric would be pretty time consuming and require way too much concentration.
What a good time to test out the fabric markers from Sharpie.
Stained by Sharpie.


i had come up with my own three colour design based on the plethora of vintage matchbox artwork, and i only required red and black sharpies with the fabric itself providing the third colour.
The tips of these liquid ink markers are very fine and sharp. Good start. However they are not soft like a paint brush as the top left corner of the pack suggests. They are hard like normal textas.

I started off with the red on my canvas. Inks like a dream. Colour is saturated and the ink did not bleed.
Buoyed by the excellent start, went to complete the picture with the black marker.
And then disaster strikes!
The red pen was so sharp and smooth, but for whatever reason, i did not have the same luck with the black. Right away, pen on fabric, the ink bled like crazy. It probably doesnt look that bleedy from a short distance away but it felt like crazy considering the red was so sharp. Particularly obvious with the outlines.
*le sigh*

Soldiering on.
Matchbox style is alot more difficult to put together than i had anticipated. That's not to its not possible, just much trickier. Especially handling the outer casing.

Presenting my Three Ducks brand Safety Matches :)

Bang, bang

Push, push to slide out
Riveted loops for chain
I won't be putting this up on Etsy.
I love this design, but im not happy with the black ink and the overall wobbliness of the drawing. I will most probably come up with another way around the Sharpie issue and make some to put up for sale. You know what they say, where there's a will, there's a way.

Stay tuned!


Thursday, January 15, 2015

Now Open: the Art of Jemology

Its been a long time coming.
I have finally mustered up and opened up my very own Esty shop - Art of Jemology.
Yep, Jemology, that's the name of my label. Check it out!


The craft is starting to take over and as much as i enjoy making these box clutches, there just isn't enough room (real estate is at a premium here in Sydders :P donchaknow?) to keep all of them.
So why not share the love and offer them up to some happy campers.

The shop is a little bare right now, but no doubt i will be adding more.

First up is the Jemology 'Today is a Gift' large box clutch.
How cute is this japanese print!


not a real mirror makes for wobbly reflections :P


Ribbon goes all the way around!